Automatic Private IP Addressing (APIPA), is a feature of Windows (except Windows NT) operating systems.
With APIPA, DHCP clients can automatically self-configure their IP configuration with an IP address and subnet mask when a DHCP server isn’t available.
When a DHCP client boots up, it first looks for a DHCP server in order to obtain an IP configuration. If the client is unable to successfully negotiate a DHCP lease, it uses APIPA to automatically configure itself with an IP address from a range that has been reserved especially for Microsoft.
The IP address range is 169.254.0.1 through 169.254.255.254. The client also configures itself with a default class B subnet mask of 255.255.0.0. A client uses the self-configured IP address until a DHCP server becomes available.
The APIPA service also checks every five minutes for the presence of a DHCP server. If it detects a DHCP server on the network, APIPA stops, and the DHCP server replaces the APIPA networking addresses with dynamically assigned addresses.
Step-by-step procedure to disable APIPA:
Step-by-step procedure to disable APIPA:
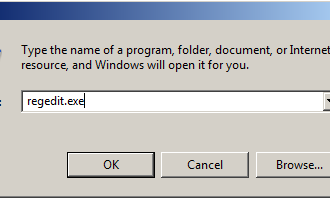
1. Access the Registry Editor
- Click START > RUN. Alternatively, you could press the Windows Key + R keys on the keyboard to open the Run prompt. Note that you will need to have administrative rights to open the Registry Editor. Type regedit.exe (or simply regedit) to bring up the Registry Editor.

- You should see the Registry Editor application similar to image below.

2. Backup the Registry
- Click Computer to highlight it, click File > Export. This will bring up the Export Registry File window. In the File name field type in the name of the registry backup, for example regbackup and click Save. By default, this will save the entire registry. (now you can work confidently knowing that you have a full backup just in case. As an added protective measure you could create a system restore point)
3. Navigate to the appropriate network adapter within the registry.
- This can be done by navigating the following path:
Computer\HKEY_LOCAL_MACHINE\SYSTEM\CurrentControlSet\Services\Tcpip\Parameters\Interfaces
- Then, locate the proper network adapter; each is labeled as a different hexadecimal subkey.

4. Disable APIPA
- Right-click anywhere in the right window pane and select New > DWORD value.
- Create the following entry: IPAutoconfigurationEnabled: REG_DWORD.
- Assign a value of 0 to disable Automatic Private IP Addressing (APIPA) support for the selected network adapter.
5. Close the registry and restart the computer.
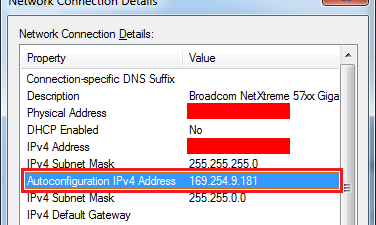
6. Test the new configuration and verify network connectivity.
- Type ipconfig /all in the command-line to see if the correct IP address is being obtained from the DHCP server. You can also test whether your registry entry was applied correctly by viewing the Autoconfiguration Enabled field within the results of the ipconfig. It should say No.
- Connect to LAN servers, domain controllers, and to the Internet to verify network connectivity. Of course, the IP address you obtain will most likely be different than the one in the scenario; also, it might be a different IP than the computer was using previously.
You can just DOWNLOAD and simply add this to registry: disableAPIPA.reg


Disabling Apipa – Automatic Private Ip Addressing >>>>> Download Now
ReplyDelete>>>>> Download Full
Disabling Apipa – Automatic Private Ip Addressing >>>>> Download LINK
>>>>> Download Now
Disabling Apipa – Automatic Private Ip Addressing >>>>> Download Full
>>>>> Download LINK